CI 的实践与通过 CI 进行前端安全质量保障
在上一篇章,我们了解到什么是 CICD。
本篇文章通过 github actions 介绍如何通过 CI 进行前端的质量检查。
话不多说,先以一个流程简单的 CI 配置开始,在 CI 中介入以下流程。
- Install。依赖安装。
- Lint。保障统一的代码风格。
- Test。单元测试。
- Preview。生成一个供测试人员进行检查的网址。
由于,Preview 是一个较为复杂的流程,留在以后篇章详解,今天先来说一下 Lint/Test。
我们假设一个极其简单的 Git Workflow 场景。
- 每个人在功能分支进行新功能开发,分支名
feature-*。每一个功能分支将会有一个功能分支的测试环境地址,如<branch>.dev.shanyue.tech。 - 当功能分支测试完毕没有问题后,合并至主分支
master。在主分支将会部署到生产环境。 - 当生产环境出现问题时,切除一条分支
hotfix-*,解决紧急 Bug。
为了保障代码质量,线上的代码必须通过 CI 检测,但是应选择什么时机 (什么分支,什么事件)?
- 功能分支提交后(CI 阶段),进行 Build、Lint、Test、Preview 等,如未通过 CICD,则无法 Preview,更无法合并到生产环境分支进行上线
- 功能分支通过后(CI 阶段),合并到主分支,进行自动化部署。
在 CI 操作保障代码质量的环节中,可确定以下时机:
# 当功能分支代码 push 到远程仓库后,进行 CI
on:
  push:
    branches:
      - 'feature/**'
或者将 CI 阶段提后至 PR 阶段,毕竟能够保障合并到主分支的代码没有质量问题即可。(但同时建议通过 git hooks 在客户端进行代码质量检查)
# 当功能分支代码 push 到远程仓库以及是 Pull Request 后,进行 CI
on:
  pull_request:
    types:
      # 当新建了一个 PR 时
      - opened
      # 当提交 PR 的分支,未合并前并拥有新的 Commit 时
      - synchronize
    branches:
      - 'feature/**'
通过 CI,我们可以快速反馈,并促进敏捷迭代。这要求我们使用 Git 时尽早提交以发现问题,以功能小点为单位频繁提交发现问题,也避免合并分支时发现重大冲突。
任务的并行与串行
在 CI 中,互不干扰的任务并行执行,可以节省很大时间。如 Lint 和 Test 无任何交集,就可以并行执行。
但是 Lint 和 Test 都需要依赖安装 (Install),在依赖安装结束后再执行,此时就是串行的。
而进行串行时,如果前一个任务失败,则下一个任务也无法继续。即如果测试无法通过,则无法进行 Preview���更无法上线。
PS: 此处可控制某些任务允许失败。如 Github Actions 中的 jobs.<job_id>.continue-on-error
使用 Github Actions 进行 CI
我们写一段 github actions 脚本,用以对我们的试验项目 cra-deploy 进行 Lint/Test。
由于 create-react-app 使用 ESLint Plugin 源码 进行代码检查,而非命令行式命令。
当 ESLint 存在问题时,create-react-app 会判断当前是否 CI 环境来决定报错还是警告,而在 CI 中 npm run build 将会报错。
因此,我这里使用 npm run build 来模拟 Lint 检查。
脚本路径位于 workflows/ci.yaml。
# 关于本次 workflow 的名字
name: CI

# 执行 CI 的时机: 当 git push 代码到 github 时
on: [push]

# 执行所有的 jobs
jobs:
  lint:
    runs-on: ubuntu-latest
    steps:
      # 切出代码,使用该 Action 将可以拉取最新代码
      - uses: actions/checkout@v2

      # 配置 node.js 环境,此时使用的是 node14
      # 注意此处 node.js 版本,与 Docker 中版本一致,与 package.json 中 engines.node 版本一致
      # 如果需要测试不同 node.js 环境下的表现,可使用 matrix
      - name: Setup Node
        uses: actions/setup-node@v1
        with:
          node-version: 14.x

      # 安装依赖
      - name: Install Dependencies
        run: yarn

      # 在 cra 中,使用 npm run build 来模拟 ESLint
      - name: ESLint
        run: npm run build
  test:
    runs-on: ubuntu-latest
    steps:
      - uses: actions/checkout@v2
      - name: Setup Node
        uses: actions/setup-node@v1
        with:
          node-version: 14.x
      - name: Install Dependencies
        run: yarn
      - name: Test
        run: npm run test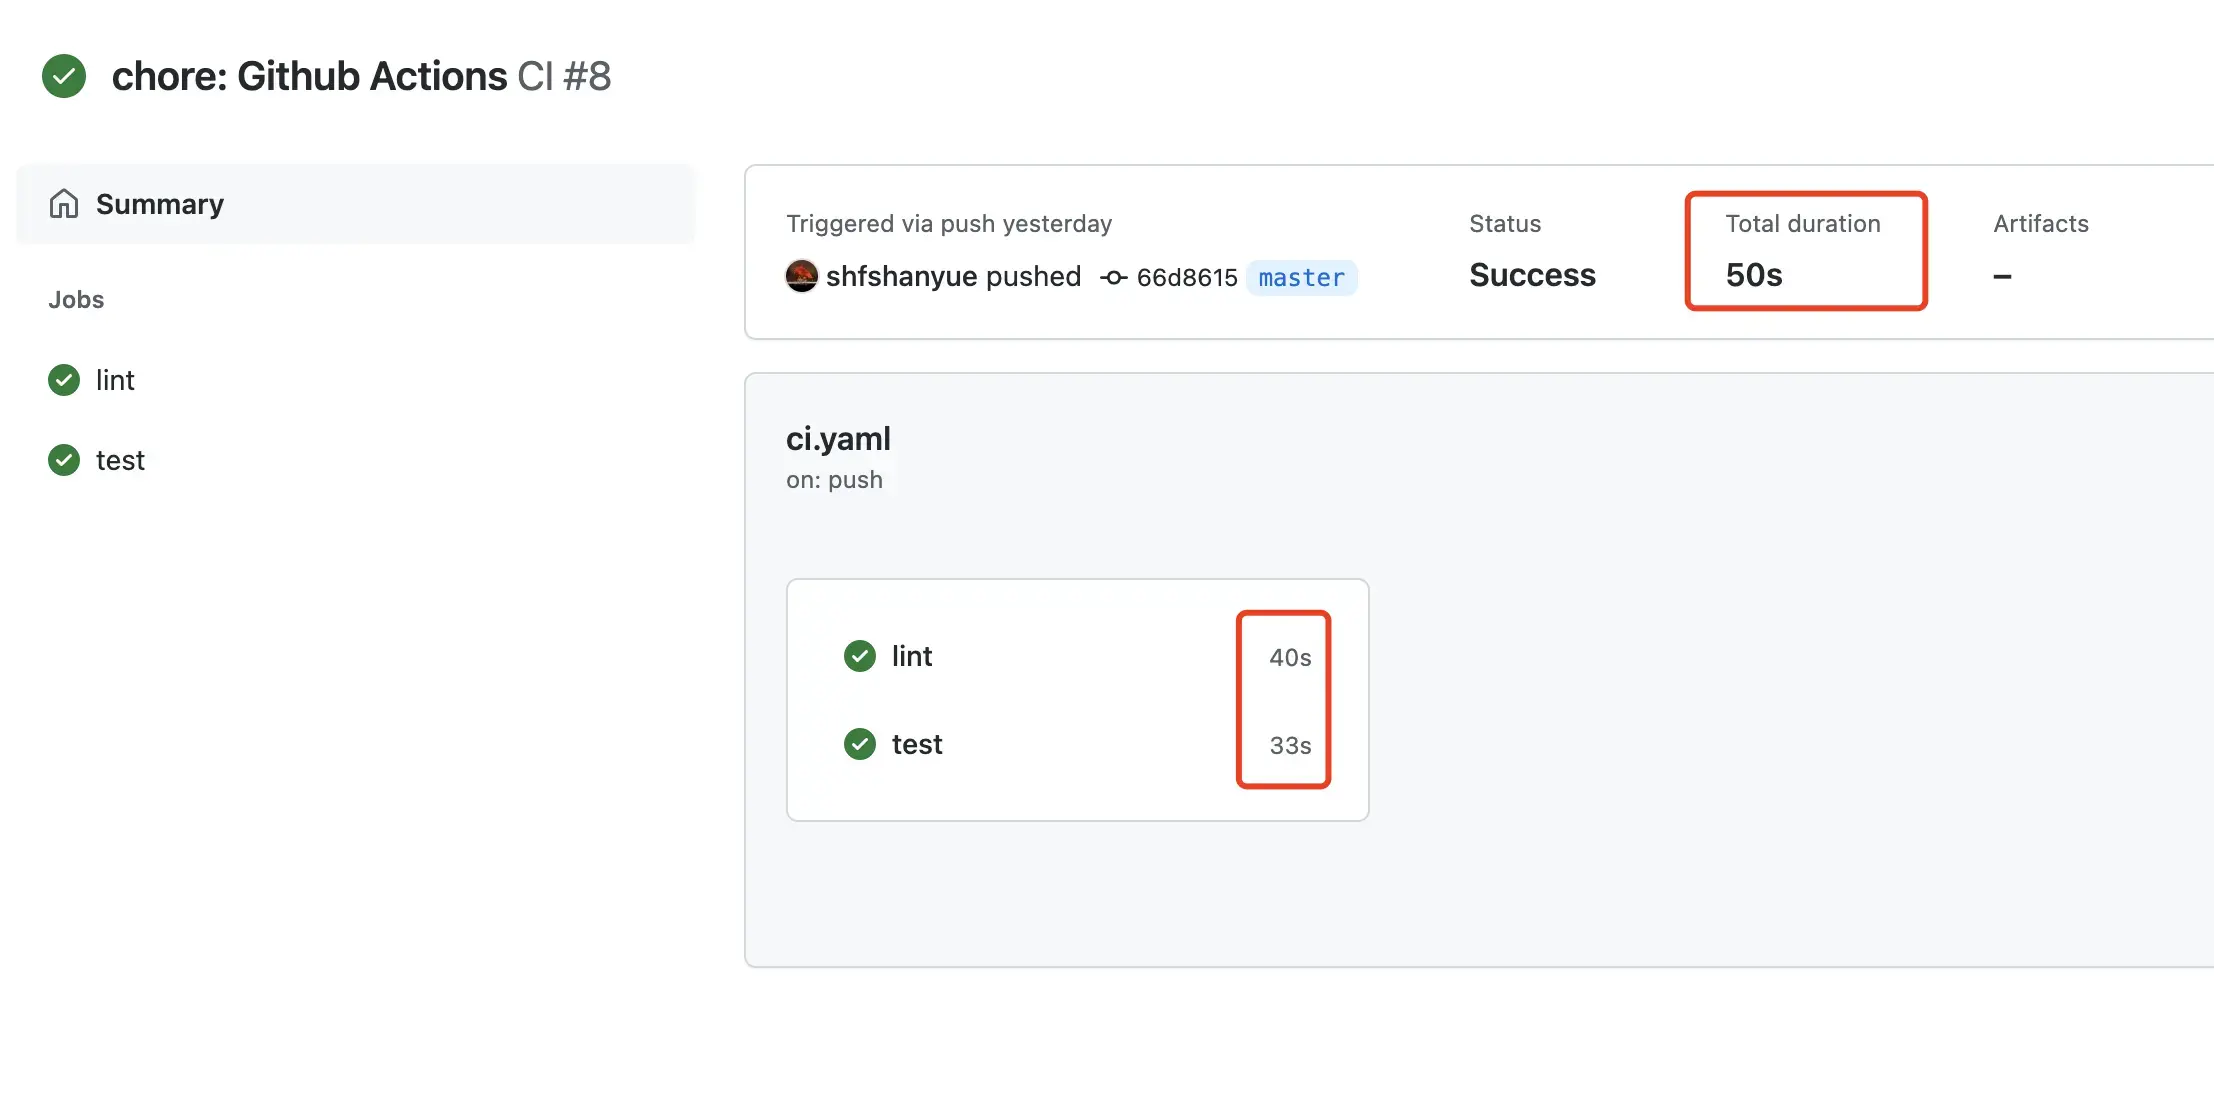
关于截图的本次 Action 执行情况
lint执行了 40stest执行了 33s- 两者并行执行,总共执行了 50s
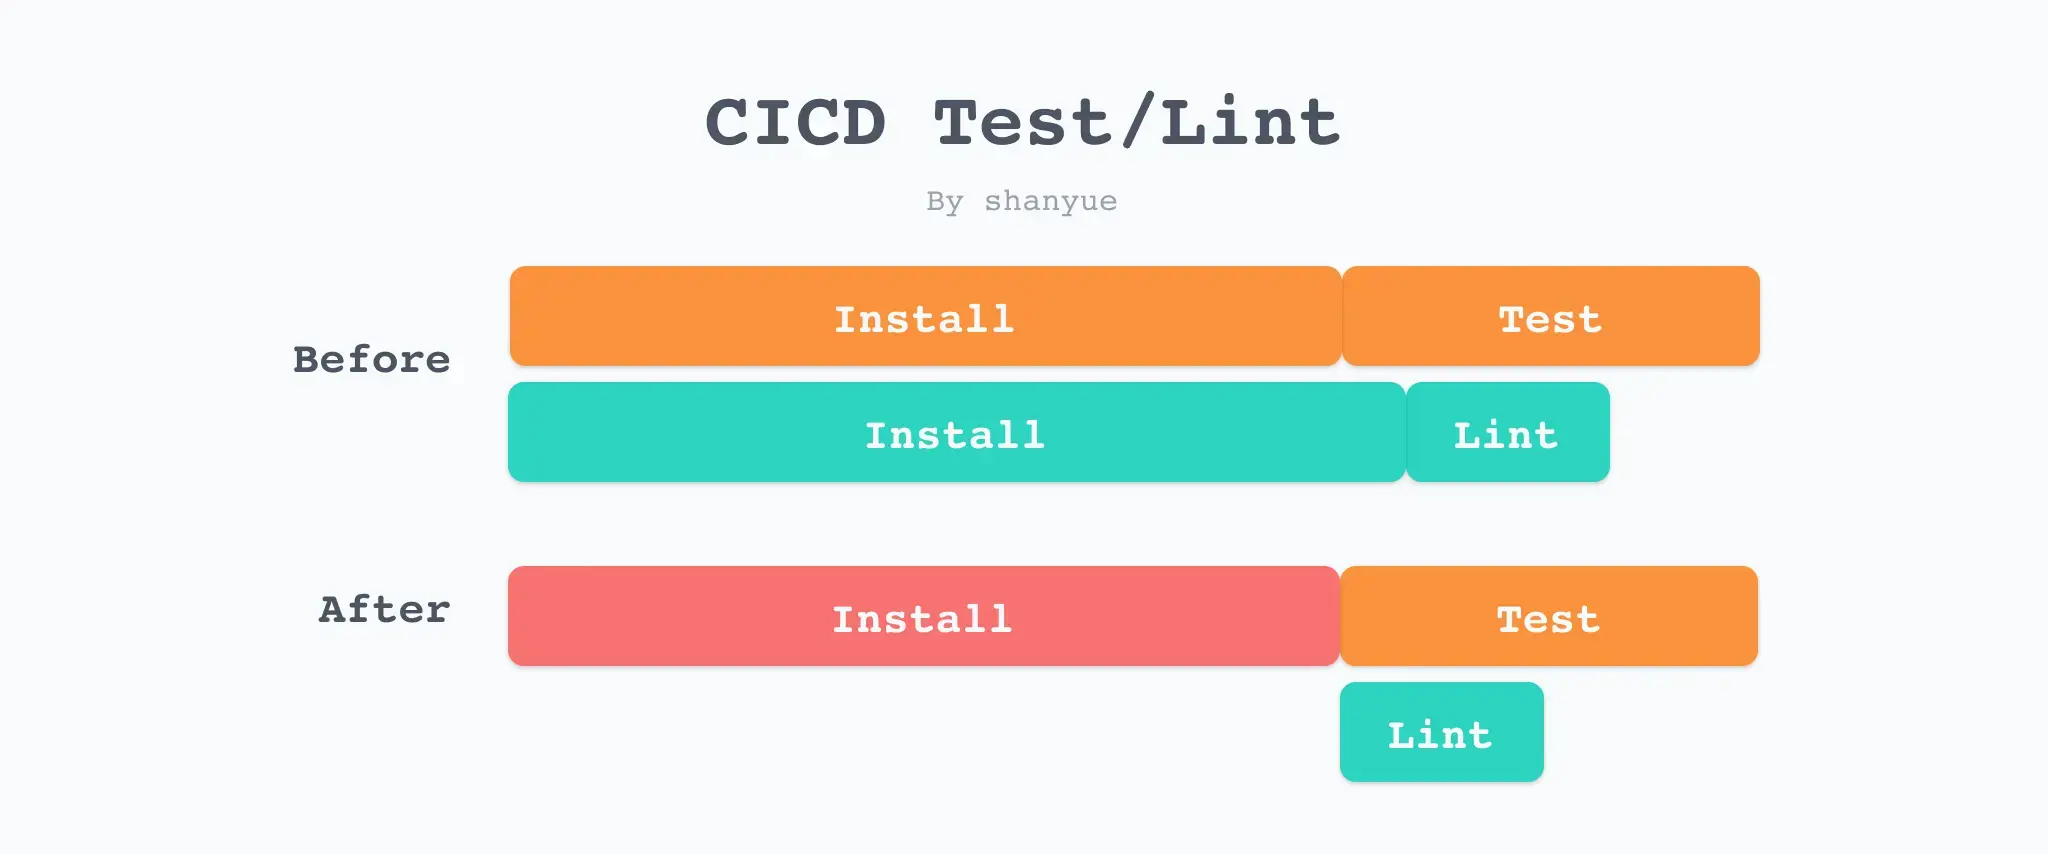
尽管二者并行执行,但可以把 Install 的过程抽离来减少服务器的并行压力。
将 Install 过程前置
首先,将 Install 前置会节省服务器资源,但并不会加快 CI 时间。甚至因为多了一个 JOB,Job 间切换也需要花费时间,总时间还会略有增加。
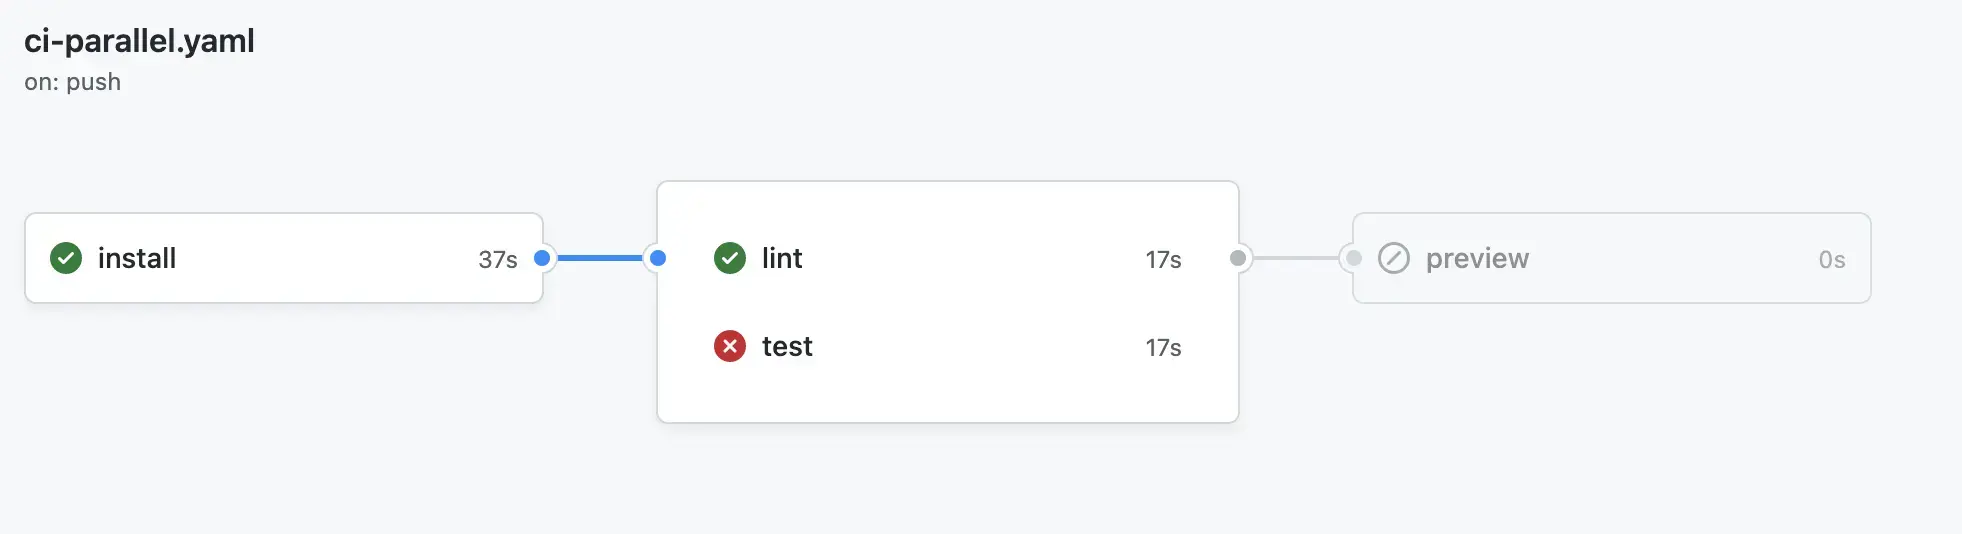
脚本路径位于 workflows/ci-parallel.yaml。
在 Lint/Test 需要使用到 Install 阶段构建而成的 node_modules 目录,CI Cache 可在不同的 Job 间共享资源数据。此处先忽略,在下一篇文章进行讲解。
一个 Job 依赖另一个 Job,在 Github Actions 中可使用 needs 字段。
install:
lint:
  needs: install
test:
  needs: install
完整配置文件如下,关于 Cache 将在下节篇章讲解。
name: CI Parallel
on: [push]
jobs:
  install:
    runs-on: ubuntu-latest
    steps:
      - uses: actions/checkout@v2
      - name: Setup Node
        uses: actions/setup-node@v1
        with:
          node-version: 14.x
      - name: Cache Node Modules
        id: cache-node-modules
        uses: actions/cache@v2
        with:
          path: node_modules
          key: node-modules-${{ hashFiles('yarn.lock') }}
          restore-keys: node-modules-
      - name: Install Dependencies
        if: steps.cache-node-modules.outputs.cache-hit != 'true'
        run: yarn
  lint:
    runs-on: ubuntu-latest
    # 通过 needs 字段可设置前置依赖的 Job,比如 install
    needs: install
    steps:
      - uses: actions/checkout@v2
      - name: Setup Node
        uses: actions/setup-node@v1
        with:
          node-version: 14.x
      - name: Cache Node Modules
        id: cache-node-modules
        uses: actions/cache@v2
        with:
          path: node_modules
          key: node-modules-${{ hashFiles('yarn.lock') }}
          restore-keys: node-modules-
      - name: ESLint
        run: npm run build
  test:
    runs-on: ubuntu-latest
    needs: install
    steps:
      - uses: actions/checkout@v2
      - name: Setup Node
        uses: actions/setup-node@v1
        with:
          node-version: 14.x
      - name: Cache Node Modules
        id: cache-node-modules
        uses: actions/cache@v2
        with:
          path: node_modules
          key: node-modules-${{ hashFiles('yarn.lock') }}
          restore-keys: node-modules-
      - name: Test
        run: npm run test
  preview:
    runs-on: ubuntu-latest
    needs: [lint, test]
    steps:
      - run: echo 'Preview OK'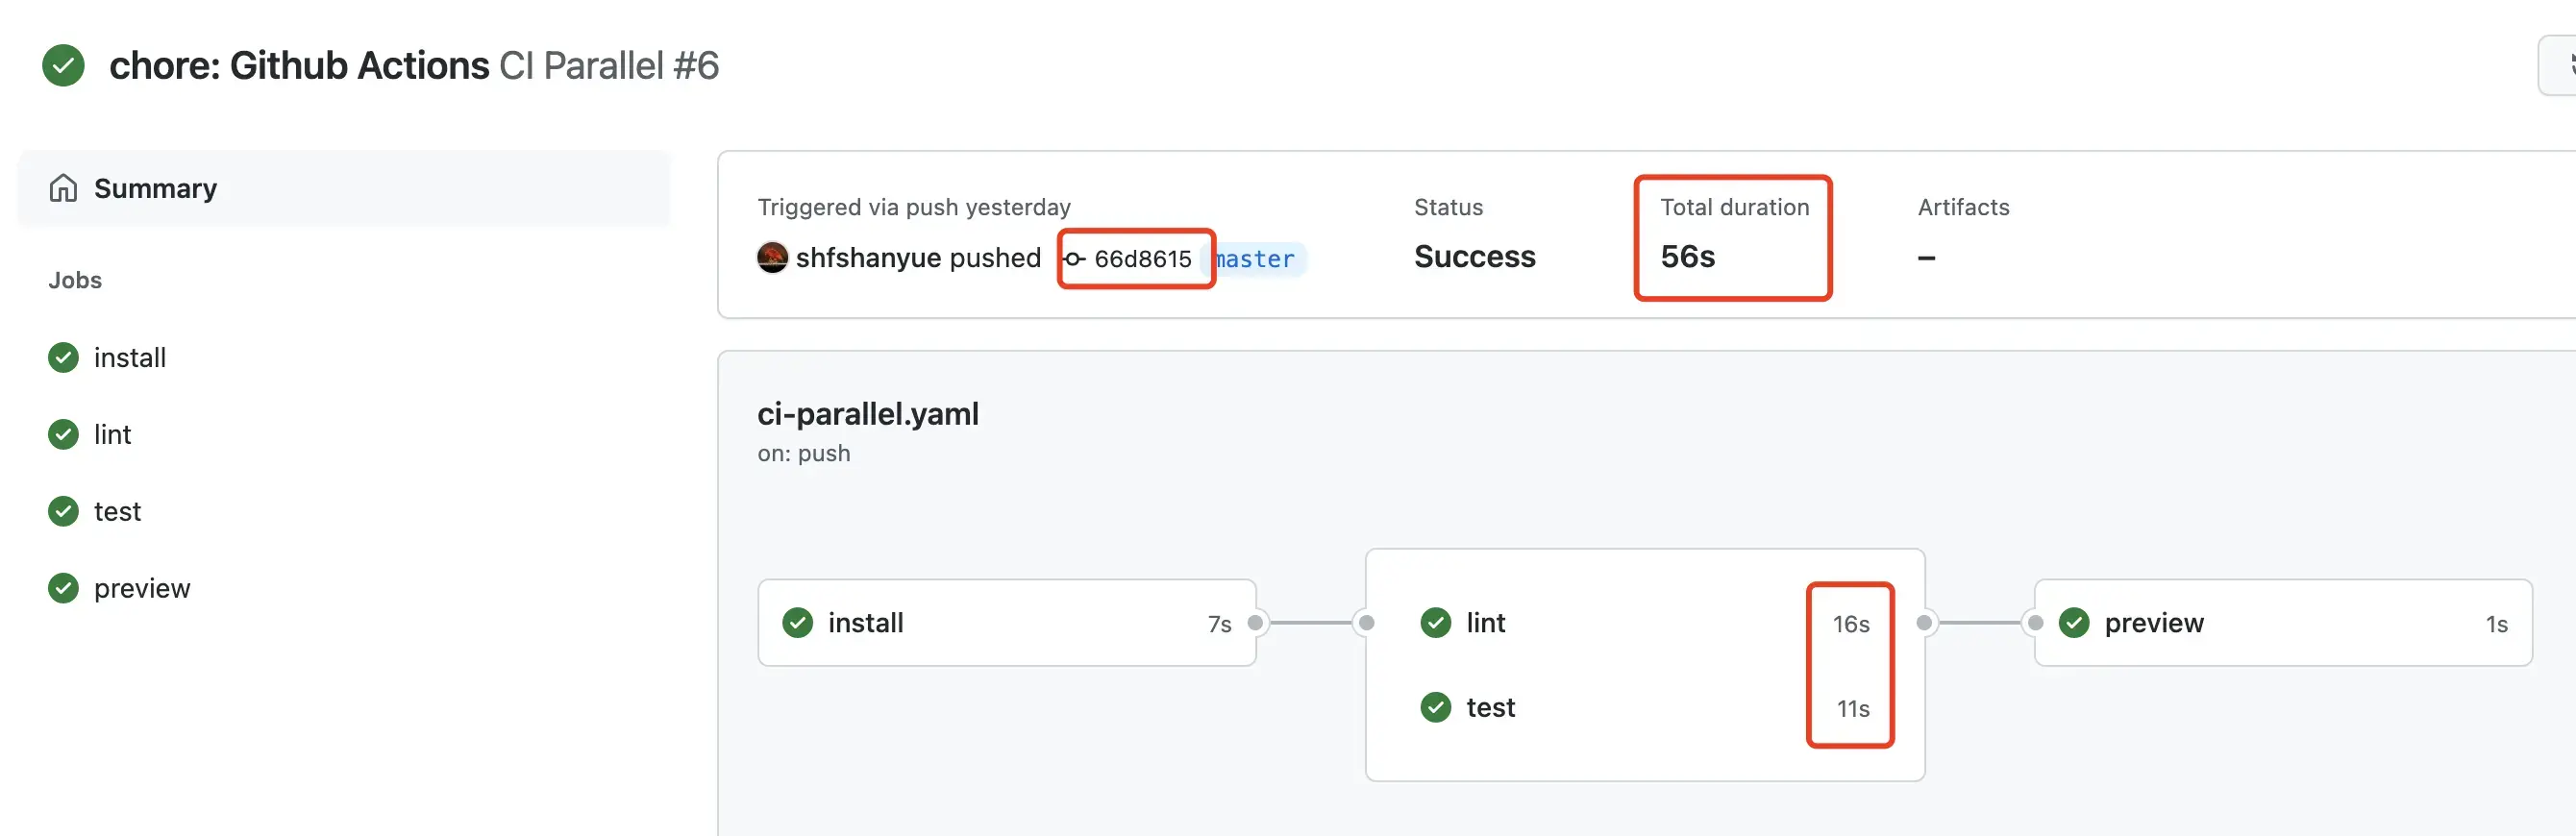
关于截图的本次 Action 执行情况
从图中也可以看出 Lint 和 Test 用了更好的时间,然而总时长还略有增加。
更高级的 CI 检查
Lint 和 Test 仅是 CI 中最常见的阶段。为了保障我们的前端代码质量,还可以添加以下阶段。
- Audit: 使用
npm audit或者 snyk 检查依赖的安全风险。可详查文章如何检测有风险依赖 - Quality: 使用 SonarQube 检查代码质量。
- Container Image: 使用 trivy 扫描容器镜像安全风险。
- End to End: 使用 Playwright 进行 UI 自动化测试。
- Bundle Chunk Size Limit: 使用 size-limit 限制打包体积,打包体积过大则无法通过合并。
- Performance (Lighthouse CI): 使用 lighthouse CI 为每次 PR 通过 Lighthouse 打分,如打分过低则无法通过合并。
与 Git Hooks 的不同
有些细心并知识面广泛的同学可能注意到了,某些 CI 工作也可在 Git Hooks 完成,确实如此。
它们的最大的区别在于一个是客户端检查,一个是服务端检查。而客户端检查是天生不可信任的。
而针对 git hooks 而言,很容易通过 git commit --no-verify 而跳过。

最重要的是,CI 还可对部署及其后的一系列操作进行检查,如端对端测试、性能测试以及容器扫描(见上)等。
作业
- 初阶:使用 github actions 配置 lint
- 中阶:使用 github actions 配置 audit
- 面试:你们在 CI 中做了那些检测
小结
本篇文章通过 Github Actions 配置了 Lint/Test,并给出了更多可在 CI 中所做的代码质量检查。
那在 Pipeline 的多个阶段,如何更好利用缓存呢?