写给前端的 nginx 配置指南
三年经验的前端或多或少与 nginx 配置打过交道。
nginx 的重要性不言而喻。
本篇文章以前端的视角,介绍下 nginx 的常见配置,并通过 docker 的方式学习 nginx,这保证所有示例配置都能正常运行。
我将本文所有关于 docker/nginx 的配置放置在 simple-deploy,可克隆下来通过 docker compose 快速运行。
并将所有的接口示例维护在了 Learn Nginx By Docker 文档,并可通过 Apifox 打开并快速调试。
可通过以下步骤,在 apifox 中调试 nginx 接口。
- 下载 Apifox
- 在 Apifox 中克隆该项目
- 在 Github 中克隆示例仓库
- 克隆下来后,进入 learn-nginx 目录
docker-compose up启动容器- 打开 Apifox 调试接口学习 nginx
nginx 的配置文件
我们通过 nginx 镜像来了解 nginx 的配置文件都有哪些。
$ docker run -it --rm nginx:alpine sh

$ ls -lah /etc/nginx/
total 40K
drwxr-xr-x    3 root     root        4.0K Nov 13  2021 .
drwxr-xr-x    1 root     root        4.0K Jun 14 07:55 ..
drwxr-xr-x    2 root     root        4.0K Nov 13  2021 conf.d
-rw-r--r--    1 root     root        1.1K Nov  2  2021 fastcgi.conf
-rw-r--r--    1 root     root        1007 Nov  2  2021 fastcgi_params
-rw-r--r--    1 root     root        5.2K Nov  2  2021 mime.types
lrwxrwxrwx    1 root     root          22 Nov 13  2021 modules -> /usr/lib/nginx/modules
-rw-r--r--    1 root     root         648 Nov  2  2021 nginx.conf
-rw-r--r--    1 root     root         636 Nov  2  2021 scgi_params
-rw-r--r--    1 root     root         664 Nov  2  2021 uwsgi_params
在 nginx 中,其中比较重要的有以下几个文件,而它们都是有层层关联的:
/etc/nginx/nginx.conf/etc/nginx/conf.d/default.conf
/etc/nginx/nginx.conf
nginx 主配置文件,引用了 /etc/nginx/conf.d/ 目录下的所有配置文件。
user  nginx;
worker_processes  auto;

error_log  /var/log/nginx/error.log notice;
pid        /var/run/nginx.pid;


events {
    worker_connections  1024;
}


http {
    include       /etc/nginx/mime.types;
    default_type  application/octet-stream;

    log_format  main  '$remote_addr - $remote_user [$time_local] "$request" '
                      '$status $body_bytes_sent "$http_referer" '
                      '"$http_user_agent" "$http_x_forwarded_for"';

    access_log  /var/log/nginx/access.log  main;

    sendfile        on;
    #tcp_nopush     on;

    keepalive_timeout  65;

    #gzip  on;

    include /etc/nginx/conf.d/*.conf;
}
/etc/nginx/conf.d/default.conf
server {
    listen       80;
    server_name  localhost;

    #access_log  /var/log/nginx/host.access.log  main;

    location / {
        root   /usr/share/nginx/html;
        index  index.html index.htm;
    }

    #error_page  404              /404.html;

    # redirect server error pages to the static page /50x.html
    #
    error_page   500 502 503 504  /50x.html;
    location = /50x.html {
        root   /usr/share/nginx/html;
    }

    # proxy the PHP scripts to Apache listening on 127.0.0.1:80
    #
    #location ~ \.php$ {
    #    proxy_pass   http://127.0.0.1;
    #}

    # pass the PHP scripts to FastCGI server listening on 127.0.0.1:9000
    #
    #location ~ \.php$ {
    #    root           html;
    #    fastcgi_pass   127.0.0.1:9000;
    #    fastcgi_index  index.php;
    #    fastcgi_param  SCRIPT_FILENAME  /scripts$fastcgi_script_name;
    #    include        fastcgi_params;
    #}

    # deny access to .htaccess files, if Apache's document root
    # concurs with nginx's one
    #
    #location ~ /\.ht {
    #    deny  all;
    #}
}
/usr/share/nginx/html
默认的静态资源目录,其目录下的 index.html 也是 nginx 的欢迎页面。
<!DOCTYPE html>
<html>
<head>
<title>Welcome to nginx!</title>
<style>
html { color-scheme: light dark; }
body { width: 35em; margin: 0 auto;
font-family: Tahoma, Verdana, Arial, sans-serif; }
</style>
</head>
<body>
<h1>Welcome to nginx!</h1>
<p>If you see this page, the nginx web server is successfully installed and
working. Further configuration is required.</p>

<p>For online documentation and support please refer to
<a href="http://nginx.org/">nginx.org</a>.<br/>
Commercial support is available at
<a href="http://nginx.com/">nginx.com</a>.</p>

<p><em>Thank you for using nginx.</em></p>
</body>
</html>
通过 docker 高效学习 nginx 配置
推荐一种高效学习 nginx 的方法: 在本地使用 nginx 镜像并挂载 nginx 配置启动容器。

通过以下 docker-compose 可秒级验证 nginx 配置,无疑是学习 nginx 的绝佳利器。
我将所有关于 nginx 的配置放置在 simple-deploy,并且每一份配置对应 docker-compose 中的一个 service 如以下 nginx、location、order1 就是 service。
version: "3"
services:
  # 关于 nginx 最常见配置的学习
  nginx:
    image: nginx:alpine
    ports:
      - 8080:80
    volumes:
      - ./nginx.conf:/etc/nginx/conf.d/default.conf
      - .:/usr/share/nginx/html
  # 关于 location 的学习
  location: ...
  # 关于 location 匹配顺序的学习
  order1: ...
每次修改配置时,需要重启容器,可根据服务名学习指定内容。
$ docker-compose up <service>

# 学习 nginx 最基础的配置
$ docker-compose up nginx

# 学习关于 location 的配置
$ docker-compose up location
本篇文章所有的 nginx 配置均可以通过 docker 来进行学习,并附全部代码及配置。
root 与 index
root: 静态资源的根路径。见文档 https://nginx.org/en/docs/http/ngx_http_core_module.html#rootindex: 当请求路径以/结尾时,则自动寻找该路径下的 index 文件。见文档 https://nginx.org/en/docs/http/ngx_http_index_module.html#index
root 与 index 为前端部署的基础,在默认情况下 root 为 /usr/share/nginx/html,因此我们部署前端时,往往将构建后的静态资源目录挂载到该地址。
server {
    listen       80;
    server_name  localhost;

    root   /usr/share/nginx/html;
    index  index.html index.htm;
}
location
location 用以匹配路由,配置语法如下。
location [ = | ~ | ~* | ^~ ] uri { ... }其中 uri 前可提供以下修饰符
=精确匹配,优先级最高。^~前缀匹配,优先级其次。如果同样是前缀匹配,走最长路径。~正则匹配,优先级再次 (~* 只是不区分大小写,不单列)。如果同样是正则匹配,走第一个路径。/通用匹配,优先级再次。
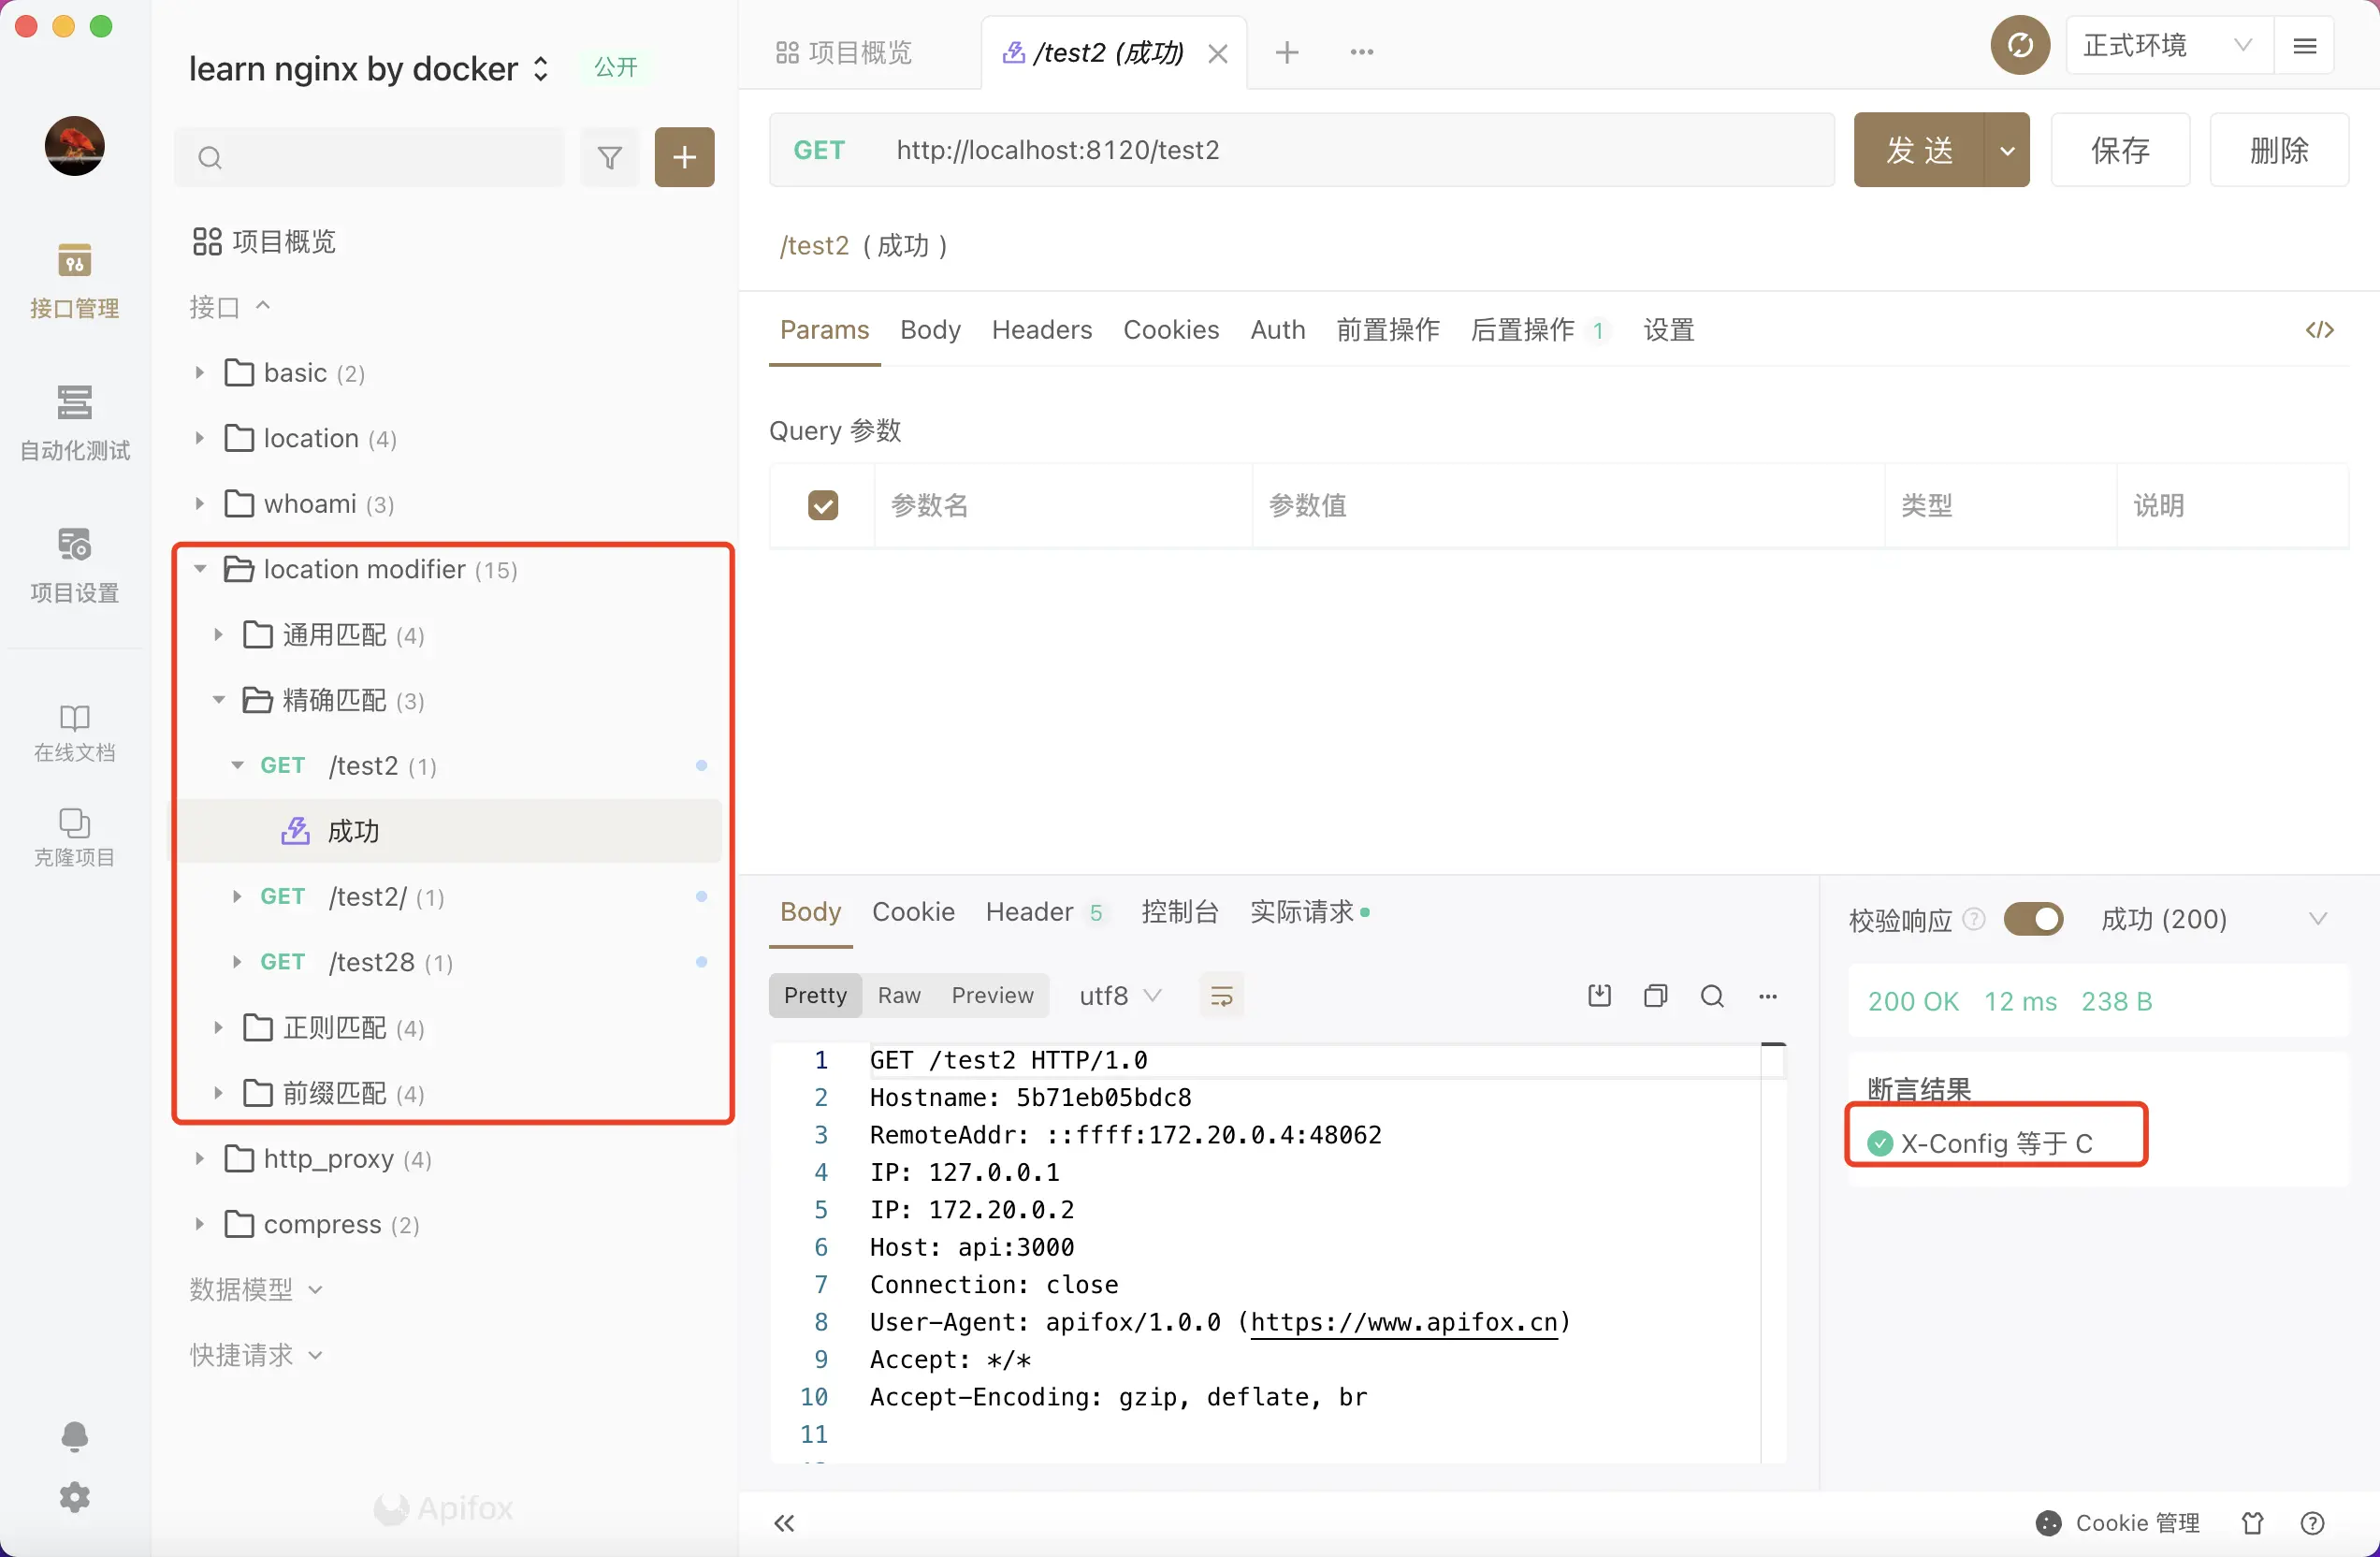
为了验证所匹配的 location,我会在以下示例中添加一个自定义响应头 X-Config,可通过浏览器控制台网络面板验证其响应头。
add_header X-Config B;注意,我所有配置文件中的链接可直接点击,避免了在 compose 配置文件中寻找映射端口号的不方便。
location 修饰符验证
对于此四种修饰符可以在我的 nginx 下进行验证。
由于此处使用了 proxy_pass,因此需要 location2,api 两个服务一起启动,在 location2 服务中,可直接通过 service 名称作为 hostname 即 http://api:3000 访问 api 服务。
而 api 服务,为我自己写的一个 whoami 服务,用以打印出请求路径等信息,详见 shfshanyue/whoami。
$ docker-compose up location2 api以下是关于验证 location 的配置文件,详见 shfshanyue/simple-daploy:learn-nginxs
server {
    listen       80;
    server_name  localhost;

    root   /usr/share/nginx/html;
    index  index.html index.htm;

    # 通用匹配,所有 /xxx 任意路径都会匹配其中的规则
    location / {
        add_header X-Config A;
        try_files  $uri $uri.html $uri/index.html /index.html;
    }

    # http://localhost:8120/test1           ok
    # http://localhost:8120/test1/          ok
    # http://localhost:8120/test18          ok
    # http://localhost:8120/test28          not ok
    location /test1 {
        # 可通过查看响应头来判断是否成功返回
        add_header X-Config B;
        proxy_pass http://api:3000;
    }

    # http://localhost:8120/test2           ok
    # http://localhost:8120/test2/          not ok
    # http://localhost:8120/test28          not ok
    location = /test2 {
        add_header X-Config C;
        proxy_pass http://api:3000;
    }

    # http://localhost:8120/test3           ok
    # http://localhost:8120/test3/          ok
    # http://localhost:8120/test38          ok
    # http://localhost:8120/hellotest3      ok
    location ~ .*test3.* {
        add_header X-Config D;
        proxy_pass http://api:3000;
    }

    # http://localhost:8120/test4           ok
    # http://localhost:8120/test4/          ok
    # http://localhost:8120/test48          ok
    # http://localhost:8120/test28          not ok
    location ^~ /test4 {
        # 可通过查看响应头来判断是否成功返回
        add_header X-Config E;
        proxy_pass http://api:3000;
    }
}
location 优先级验证
在我配置文件中,以 order 打头来命名所有优先级验证的 nginx 配置,总共有四个配置文件,详见 docker-compose。
此处仅仅以 order1 为例进行验证,配置如下:
# 以下配置,访问以下链接,其 X-Config 为多少
#
# http://localhost:8210/shanyue,为 B,若都是前缀匹配,则找到最长匹配的 location

server {
    root   /usr/share/nginx/html;

    # 主要是为了 shanyue 该路径,因为没有后缀名,无法确认其 content-type,会自动下载
    # 因此这里采用 text/plain,则不会自动下载
    default_type text/plain;

    location ^~ /shan {
        add_header X-Config A;
    }

    location ^~ /shanyue {
        add_header X-Config B;
    }
}
启动服务:
$ docker-compose up order1curl 验证:
当然也可以通过浏览器控制台网络面板验证,由于此处只需要验证响应头,则我们通过 curl --head 只发送 head 请求即可。
# 查看其 X-Config 为 B
$ curl --head http://localhost:8210/shanyue
HTTP/1.1 200 OK
Server: nginx/1.21.4
Date: Fri, 03 Jun 2022 10:15:11 GMT
Content-Type: text/plain
Content-Length: 15
Last-Modified: Thu, 02 Jun 2022 12:44:23 GMT
Connection: keep-alive
ETag: "6298b0a7-f"
X-Config: B
Accept-Ranges: bytes
proxy_pass
proxy_pass 反向代理,也是 nginx 最重要的内容,这也是常用的解决跨域的问题。
当使用 proxy_pass 代理路径时,有两种情况
- 代理服务器地址不含 URI,则此时客户端请求路径与代理服务器路径相同。强烈建议这种方式
- 代理服务器地址含 URI,则此时客户端请求路径匹配 location,并将其 location 后的路径附在代理服务器地址后。
# 不含 URI
proxy_pass http://api:3000;

# 含 URI
proxy_pass http://api:3000/;
proxy_pass http://api:3000/api;
proxy_pass http://api:3000/api/;
再举一个例子:
- 访问 http://localhost:8300/api3/hello,与以下路径匹配成功
proxy_pass附有 URI- 匹配路径后多余的路径为
/hello,将其附在proxy_pass之后,得 http://api:3000/hello/hello
location /api3 {
    add_header X-Config C;

    # http://localhost:8300/api3/hello -> proxy:3000/hello/hello
    proxy_pass http://api:3000/hello;
}
有点拗口,在我们试验环境有多个示例,使用以下代码启动可反复测试:
$ docker-compose up proxy api由于 proxy_pass 所代理的服务为 whoami,可打印出真实请求路径,可根据此进行测试
server {
    listen       80;
    server_name  localhost;

    root   /usr/share/nginx/html;
    index  index.html index.htm;

    # 建议使用此种 proxy_pass 不加 URI 的写法,原样路径即可
    # http://localhost:8300/api1/hello -> proxy:3000/api1/hello
    location /api1 {
        # 可通过查看响应头来判断是否成功返回
        add_header X-Config A;
        proxy_pass http://api:3000;
    }

    # http://localhost:8300/api2/hello -> proxy:3000/hello
    location /api2/ {
        add_header X-Config B;
        proxy_pass http://api:3000/;
    }

    # http://localhost:8300/api3/hello -> proxy:3000/hello/hello
    location /api3 {
        add_header X-Config C;
        proxy_pass http://api:3000/hello;
    }

    # http://localhost:8300/api4/hello -> proxy:3000//hello
    location /api4 {
        add_header X-Config D;
        proxy_pass http://api:3000/;
    }
}
add_header
控制响应头。
由于很多特性都是通过响应头控制,因此基于此指令可做很多事情,比如:
- Cache
- CORS
- HSTS
- CSP
- …
Cache
location /static {
    add_header Cache-Control max-age=31536000;
}
CORS
location /api {
    add_header Access-Control-Allow-Origin *;
}
HSTS
location / {
    listen 443 ssl;

    add_header Strict-Transport-Security max-age=7200;
}
CSP
location / {
    add_header Content-Security-Policy "default-src 'self';";
}
作业
- 基于 docker 学习 nginx 配置,并可配置 index.html 强缓存 60s 时间
- 如何使用 nginx 与 whoami 镜像,模拟 502/504
- 基于 docker 学习 nginx 配置,并可配置 gzip/brotli
- brotli/gzip 有何区别